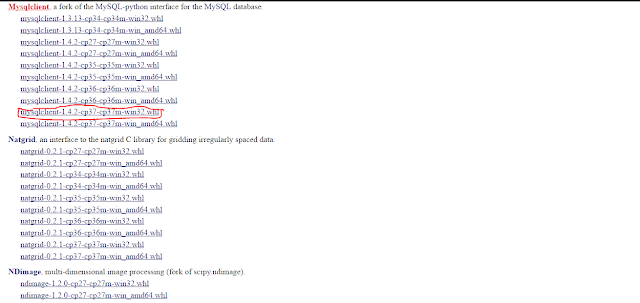
Step1:
Go to https://www.lfd.uci.edu/~gohlke/pythonlibs/#mysqlclient to download mysqlclient library and download the version which suits your python version. To check whether your installed python is 32/64 bits, simply search for python in search box in windows 10.
Warning: Though your pc is 64 bits, the python on your pc may be of 32 bits so download the mysqlclient file according to bits of python.
In my case, my python is 32 bits so I have installed the given file.

Step 2:
Now open django project and click on the terminal tab as shown in figure below (with red a mark):
Then copy the file download in step 1 to the folder of your django project (path marked by blue pen in figure above).
Step 3:
Run the given command:
pip install mysqlclient-1.4.2-cp37-cp37m-win32.whl
Here, the bold words are filename of the mysqlclient library so it may varies depending on which file did you download from the website. So use the file name of downloaded file in place of bold words in the command.
Finally, your install is successful.
Your output will be something like this:
(venv) G:\Programming\dj6>pip install mysqlclient-1.4.2-cp37-cp37m-win32.whl
Processing g:\programming\dj6\mysqlclient-1.4.2-cp37-cp37m-win32.whl
Installing collected packages: mysqlclient
Successfully installed mysqlclient-1.4.2
Here is the video for above process...
Go to https://www.lfd.uci.edu/~gohlke/pythonlibs/#mysqlclient to download mysqlclient library and download the version which suits your python version. To check whether your installed python is 32/64 bits, simply search for python in search box in windows 10.
Warning: Though your pc is 64 bits, the python on your pc may be of 32 bits so download the mysqlclient file according to bits of python.
In my case, my python is 32 bits so I have installed the given file.

Step 2:
Now open django project and click on the terminal tab as shown in figure below (with red a mark):
Then copy the file download in step 1 to the folder of your django project (path marked by blue pen in figure above).
Step 3:
Run the given command:
pip install mysqlclient-1.4.2-cp37-cp37m-win32.whl
Here, the bold words are filename of the mysqlclient library so it may varies depending on which file did you download from the website. So use the file name of downloaded file in place of bold words in the command.
Finally, your install is successful.
Your output will be something like this:
(venv) G:\Programming\dj6>pip install mysqlclient-1.4.2-cp37-cp37m-win32.whl
Processing g:\programming\dj6\mysqlclient-1.4.2-cp37-cp37m-win32.whl
Installing collected packages: mysqlclient
Successfully installed mysqlclient-1.4.2
Step 4:
Open the setting.py file and change the section
DATABASES = {
    'default': {
        'ENGINE': 'django.db.backends.sqlite3',
        'NAME': os.path.join(BASE_DIR, 'db.sqlite3'),
    }
}
into
DATABASES = {
    'default': {
        'ENGINE': 'django.db.backends.mysql',
        'NAME': 'your database name',
        'USER': 'your username',
        'PASSWORD': 'your password',
        'HOST': 'localhost',
        'PORT': '3306',
    }
}
Step 5:
Use command in terminal of your django project:
python manage.py makemigrations
If it works then it is good but if it results in errors then follow the given below steps.
Step 6:
Alter the username and password of your MYSQL database server.
Open your MYSQL command line (search for mysql in search box and you can see this option). This write the given query:
ALTER USER 'root'@'localhost' IDENTIFIED BY 'your_new_password';Warning: Don't forget the semicolon(;) at the end of query;
Step 7:
Search for services in search box of windows 10 and open it. In newly opened window search for MYSQL80 and click on it. Then click on Restart option on the left side of window.
Finally again use the command below in terminal of your django project:
python manage.py makemigrations
python manage.py migrate
Wait for sometime for migrating to complete.
Following above steps will do the job.


