My Youtube Channel

Please Subscribe

Flag of Nepal

Built in OpenGL

Word Cloud in Python

With masked image

Saturday, May 18, 2019

elasticsearch - Could not find any executable java binary. Please install java in your PATH or set JAVA_HOME.


First of all make sure java jdk is installed on your system. Then go to environment variables of your system. Add new variable called "JAVA_HOME" and add variable value as the path where jdk is installed on your system (eg: C:\Program Files\Java\jdk-12.0.1) and then press ok as shown in figure below:

Now, open cmd type echo %JAVA_HOME% ,if it shows the path entered previously while creating new variable then its ok. If everything is all right upto this point, go to the folder when the files of elasticsearch is located through cmd (for eg have my folder on G: drive so my path looks like 
G:\elasticsearch\bin> ). Finally, enter elasticsearch-service.bat install.
If you see output as shown below then your installation has been successful.

G:\elasticsearch\bin>elasticsearch-service.bat install
Installing service      :  "elasticsearch-service-x64"
Using JAVA_HOME (64-bit):  "C:\Program Files\Java\jdk-12.0.1"
The service 'elasticsearch-service-x64' has been installed. 

To run elasticsearch service, again enter given command entering into the bin of your elasticsearch folder as shown below:


G:\elasticsearch\bin>elasticsearch-service.bat manager

Running this command will display a window as shown in figure below:


Click "Start" button to start the service. Wait for few seconds or a minute, then open browser and type the given URL:  http://localhost:9200/  , you can the output as shown below if everything is fine.

The elastic service can also be run through windows services. Search for services on search box on windows 10 and click on it to open services window. Then search for "Elasticsearch" and right click on it and select "Start". Again, wait for few seconds and go to http://localhost:9200/ to check if service is running or not.


Monday, May 13, 2019

The fifth final heartbreak for CSK


Having played ten seasons of IPL, CSK holds impressive records of qualifying into the playoffs every time, reaching into final eight out of ten times. But at the same time it holds scary record of loosing most of the finals it reached. CSK now have lost 5 out of 8 IPL finals having won only 3 of them, most importantly three lose came against Mumbai Indians which CSK fans obviously finds it difficult to digest. MI has won four out of their five IPL finals, all coming against Dhoni (three against CSK and one against Rising Pune Supergaint).
In this IPL 2019, MI completely dominated CSK whether in league matches or qualifier. Infact, MI were only able to beat CSK at their home not only once but twice, one in league match and another in qualifier. So, MI reached final with three wins against CSK and at the same time CSK reached final with three loses against MI. But all CSK fans were hoping that CSK can't loose four match against MI in a single season, and CSK may win the final and guess what CSK almost won the final but that last ball wicket left CSK fans with nothing but heartbreak making it fifth final loss. This loss was difficult to digest than the last four finals which CSK lost because it was so near yet so far. CSK lost just by one run. The tragedy of 2017 repeated, the only difference being it was RPS at the receiving end in 2017 and this time it was CSK.
The 2019 IPL final was actually full of drama, mistakes being committed by both team. And as MSD said at post match presentation, it was like both teams were passing trophy to one another during match by committing mistakes and allowing the opposition to make come back in the game. But CSK made more mistakes than MI did and hence paid huge price for it by rewarding trophy to MI. There were many turning points for CSK. Many says the run out of MSD or the run out of Watson but I personally feel the turning point was the wicket of Faf du Plessis. Having known that the middle order has been completely exposed this season, he should have batted long. Though CSK were in a good position at the time fall of his wicket but he was hitting the ball very well. At the same time the upcoming batsmen had been struggling throughout the season except MSD, and MSD was obviously not going to win you matches every time. But none of us thought that MSD inning would end with a run out. It was infact first run out for MSD in IPL after 2012. So nothing was going in favour of CSK except three dropped catches of Watson to keep the hope of CSK alive till the last over in the night of final. But even Watson could not take CSK over the winning line and his fabulous inning came to an end with only two balls remaining and requiring four to win. Shardul Thakur managed only two runs loosing his wickets in the ball. He was playing his only third match this season so it was not easy for him as well. I feel Jadeja could have been sent to bat before Dwayne Bravo because he had been good with the bat this season and Bravo had rarely got any chance to bat and as a result Bravo scored 15 runs of 15 balls when the required rate was almost above 11. Also, I think Imran Tahir should have been brought little earlier to bowl and should have been allowed to complete his 4 overs quota as was leading wicket taker for CSK, infact ended as leading wicket taker of this season. But now, none of these arguments matter because the fact remains that CSK lost 2019 IPL final by 1 run.
At last as a CSK fan, the only good thing about the final was Thala saying "Hopefully I will return" next year for CSK because it is difficult to imagine CSK without him and IPL without CSK.


Monday, February 11, 2019

Easily migrate a Django DB from SQLite to MySQL.


Step1: 


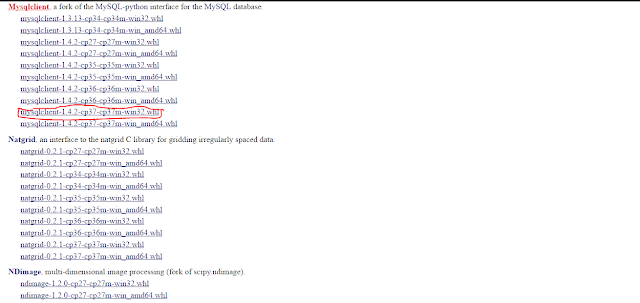
Go to https://www.lfd.uci.edu/~gohlke/pythonlibs/#mysqlclient to download mysqlclient library and download the version which suits your python version. To check whether your installed python is 32/64 bits, simply search for python in search box in windows 10.

Warning: Though your pc is 64 bits, the python on your pc may be of 32 bits so download the mysqlclient file according to bits of python.
In my case, my python is 32 bits so I have installed the given file.


Step 2:

Now open django project and click on the terminal tab as shown in figure below (with red a mark):

Then copy the file download in step 1 to the folder of your django project (path marked by blue pen in figure above).

Step 3:


Run the given command:
pip install mysqlclient-1.4.2-cp37-cp37m-win32.whl

Here, the bold words are filename of the mysqlclient library so it may varies depending on which file did you download from the website. So use the file name of downloaded file in place of bold words in the command.

Finally, your install is successful.

Your output will be something like this:

(venv) G:\Programming\dj6>pip install mysqlclient-1.4.2-cp37-cp37m-win32.whl
Processing g:\programming\dj6\mysqlclient-1.4.2-cp37-cp37m-win32.whl
Installing collected packages: mysqlclient
Successfully installed mysqlclient-1.4.2

Here is the video for above process...


Step 4:


Open the setting.py file and change the section 
DATABASES = {
    'default': {
        'ENGINE': 'django.db.backends.sqlite3',
        'NAME': os.path.join(BASE_DIR, 'db.sqlite3'),
    }
}

into 

DATABASES = {
    'default': {
        'ENGINE': 'django.db.backends.mysql',
        'NAME': 'your database name',
        'USER': 'your username',
        'PASSWORD': 'your password',
        'HOST': 'localhost',
        'PORT': '3306',
    }
}

Step 5:

Use command in terminal of your django project:
python manage.py makemigrations

If it works then it is good but if it results in errors then follow the given below steps.

Step 6:

Alter the username and password of your MYSQL database server.
Open your MYSQL command line (search for mysql in search box and you can see this option). This write the given query:
ALTER USER 'root'@'localhost' IDENTIFIED BY 'your_new_password';
Warning: Don't forget the semicolon(;) at the end of query;

Step 7: 


Search for services in search box of windows 10 and open it. In newly  opened window search for MYSQL80 and click on it. Then click on Restart option on the left side of window.


Finally again use the command below in terminal of your django project:
python manage.py makemigrations

python manage.py migrate


Wait for sometime for migrating to complete.
Following above steps will do the job.


pip install mysqlclient error fixed. 100% working solution...

Step1: 

Go to https://www.lfd.uci.edu/~gohlke/pythonlibs/#mysqlclient to download mysqlclient library and download the version which suits your python version. To check whether your installed python is 32/64 bits, simply search for python in search box in windows 10.

Warning: Though your pc is 64 bits, the python on your pc may be of 32 bits so download the mysqlclient file according to bits of python.
In my case, my python is 32 bits so I have installed the given file.


Step 2:

Now open django project and click on the terminal tab as shown in figure below (with red a mark):

Then copy the file download in step 1 to the folder of your django project (path marked by blue pen in figure above).

Step 3:

Run the given command:
pip install mysqlclient-1.4.2-cp37-cp37m-win32.whl

Here, the bold words are filename of the mysqlclient library so it may varies depending on which file did you download from the website. So use the file name of downloaded file in place of bold words in the command.

Finally, your install is successful.

Your output will be something like this:

(venv) G:\Programming\dj6>pip install mysqlclient-1.4.2-cp37-cp37m-win32.whl
Processing g:\programming\dj6\mysqlclient-1.4.2-cp37-cp37m-win32.whl
Installing collected packages: mysqlclient
Successfully installed mysqlclient-1.4.2


The above helps to install mysqlclient in pycharm. If you want to install in python directly then simply download the file as in step 1 and open command prompt and navigate to the folder where the downloaded file is available. After that, run the command as shown in step 3. This will successfully finish your installation process.

Here is the video for above process...


Tuesday, December 18, 2018

Medical store management system with visualization of data (using visual C#.NET and MYSQL)


Send your query regarding this project through email.

How to make a simple picture gallery using lightbox library in web?


HTML code

<!DOCTYPE html>
<html>
<head>
<title>PicGallery</title>
<link rel="stylesheet" type="text/css" href="css/picgallery.css">
<link rel="stylesheet" type="text/css" href="css/lightbox.min.css">
<script type="text/javascript" src="js/lightbox-plus-jquery.min.js"></script>
</head>
<body>
<h1>Image Gallery</h1>
<div class="gallery">
<a href="gallery/1.jpg" data-lightbox="MyGallery" data-title="Red flower"><img src="gallery/1.jpg"></a>
<a href="gallery/2.jpg" data-lightbox="MyGallery" data-title="Car"><img src="gallery/2.jpg"></a>
<a href="gallery/3.jpg" data-lightbox="MyGallery"><img src="gallery/3.jpg"></a>
<a href="gallery/4.jpg" data-lightbox="MyGallery"><img src="gallery/4.jpg"></a>
<a href="gallery/5.jpg" data-lightbox="MyGallery"><img src="gallery/5.jpg"></a>
<a href="gallery/6.jpg" data-lightbox="MyGallery"><img src="gallery/6.jpg"></a>
<a href="gallery/7.jpg" data-lightbox="MyGallery"><img src="gallery/7.jpg"></a>
<a href="gallery/8.jpg" data-lightbox="MyGallery"><img src="gallery/8.jpg"></a>
</div>
</body>
</html>


CSS code

h1{
color: aqua;
text-align: center;
}

.gallery img{
width: 150px;
height: 150px;
padding: 20px;
transition: 1s;
}

.gallery img:hover{

transform: scale(1.5);
}


click here to download a complete file.

Friday, December 7, 2018

Design simple yet attractive log in form using HTML and CSS.

HTML code

<!DOCTYPE html>
<html>
<head>
<title>Feedback form</title>
<link rel="stylesheet" type="text/css" href="css/feedbackform.css">
</head>
<body>
<h3>Send your feedback...</h3>
<div class=blurform>

<div class="form1">
<form action="" method="get">
<br><br><label for="email">Your email id</label><br>
<input id="email" type="text" name="email"><br>
<label for="password">Your password</label><br>
<input id="password" type="text" name="password"><br>
<label for="comment">Comment</label><br>
<textarea id="comment" name="comment" rows="12" cols="40"></textarea><br>
<input type="checkbox" id="chkbx" name="chhkbx"><label for="chkbx">I completely agree to my statements.</label><br>
<input type="submit" value="Submit">
</form>
</div>
</div>
</body>
</html>


CSS code

input[type="text"]{
height: 25px;
width:250px;
font-size: large;
}

input[type="text"],textarea{
border:none;
margin-bottom: 20px;
margin-top: 8px;
background-color: #77aaff;
    color: white;
}

textarea{
width:350px;
}


input[type="submit"]{
cursor: pointer;
margin-top: 25px;
width: 120px;
height: 40px;
color: white;
background-color: #77aaff;
border: none;
margin-bottom: 30px;
}

label{
cursor: pointer;
 
}

.form1{

width:400px;
margin: auto;
background-color:white;
padding-left: 50px;
margin-top: 5px;
    border: 1px solid #77aaff;
    box-shadow: -7px 7px 8px #77aaff;

}

.blurform{

   width:400px;
margin: auto;
box-shadow: -7px 7px 300px #77aaff;
}

h3{
padding-left: 480px;
color:#77aaff;
}

Design Home page of facebook using HTML and CSS.


HTML code:


<!DOCTYPE html>
<html>
<head>
<title>facebook</title>
<link rel="stylesheet" type="text/css" href="css/facebook.css">
</head>
<body>
<div class="topbar">

<div class="facebookfont">
<p>facebook</p>
</div>

<div class="email">
<form action="" method="get">
<label for="emailid">Email or Phone</label><br>
<input id="emailid" type="text" name="emailid">
</form>
</div>

<div class="password">
<form action="" method="get">
<label for="password">Password</label><br>
<input id="password" type="password" name="password"><br>
<label id="account">Forgot account?</label>

</form>
</div>

<div class="login">
<input type="submit" name="login" value="Log In">
</div>

</div>

<div class="wholelowersection">
<div class="firstcolumn">
<div class="firstcolumntitle">
<p>Connect with friends and the<br> world around you on Facebook.</p>
</div>
<div class="firstcolumnsubtitle1">
<div class="subtitle11">
<p>See photos and updates</p>
</div>
<div class="subtitle12">
<p>from friends in News Feed.</p>
</div>
</div>

<div class="firstcolumnsubtitle2">
<div class="subtitle11">
<p>Share what's new </p>
</div>
<div class="subtitle12">
<p>in your life on your Timeline.</p>
</div>
</div>

<div class="firstcolumnsubtitle3">
<div class="subtitle11">
<p>Find more </p>
</div>
<div class="subtitle12">
<p>of what you're looking for with Facebook Search.</p>
</div>
</div>

</div>

<div class="secondsection">
<form  action="" method="post">
<br><label id="signup">Sign Up</label><br>
<label id="free">It's free and always will be. </label><br>
<div class="flname">
<input class="name" type="text" name="fname" placeholder="First name">
<input class="name" type="text" name="lname" placeholder="Last name">
</div>

<input class="mp" type="text" name="mobileno" placeholder="Mobile number or email">
<input class="mp" type="password" name="password" placeholder="New Password"><br><br>

<div class="birthdayblock">
<div class="birthdayblock1">
<label id="lblbirthday">Birthday</label><br>
<select class="birthdayselect">
<option  id="month">Month</option>
<option id="Jan">Jan</option>
<option id="Feb">Feb</option>
<option id="Dec" selected="selected">Dec</option>
</select>

<select class="birthdayselect">
<option id="Day">Day</option>
<option id="one" >1</option>
<option id="two" selected="selected">2</option>
<option id="three">3</option>
</select>

<select class="birthdayselect">
<option id="year">Year</option>
<option selected="selected">1993</option>
<option>1996</option>
<option>1997</option>
</select>
</div>
<div class="birthdayblock2">

<label>Why do I need to provide my<br>birthday? </label>
</div>
</div>
<div class="gender">
<div>
  <input type="radio" id="female" name="gender" value="Female">
  <label for="female">Female</label>
    </div>
    <div>
  <input type="radio" id="male" name="gender" value="Male">
  <label for="male">Male</label>
</div>
</div>
<div class="agreementblock">
<p>
By clicking Sign Up, you agree to our <span >Terms, Data Policy</span> and<br> <span>Cookies Policy</span>. You may receive SMS Notifications from us and<br> can opt out any time.
</p>
</div>
<div class="signupbutton">
<input type="submit" name="signup" value="Sign Up">
</div>
</form>
</div>
</div>
</body>

</html>


CSS code

html, body, div, span, applet, object, iframe, h1, h2, h3, h4, h5, h6, p, blockquote, pre, a, abbr, acronym, address, big, cite, code, del, dfn, em, font, img, ins, kbd, q, s, samp, small, strike, strong, sub, sup, tt, var, b, u, i, center, dl, dt, dd, ol, ul, li, fieldset, form, label, legend, caption {
    margin: 0;
    padding: 0;
    border: 0;
    outline: 0;
    font-size: 100%;
    vertical-align: baseline;
    background: transparent;
}


.topbar{
width:100%;
height: 90px;
color:white;
display: inline-grid;
background-color: #3b5998;
}

.facebookfont{
padding-left: 200px;
font-family: Segoe UI;
font-size: 42px;
font-weight: bold;
padding-top: 24px;
}

.topbar{
display: grid;
grid-template-columns: 55% 13% 13% 19%;
grid-gap: 10px;

}

.topbar >div{
background-color: #3b5998;

}

.topbar >div:nth-child(odd){
background-color: #3b5998;
}

.email{
padding-top: 15px;
}

.email input[type="text"]{
margin-top: 5px;
}

.password{
padding-top: 15px;

}

.password input[type="password"]{
margin-top: 5px;
margin-bottom: 5px;
}

#account{
color: #8b9dc3;
}

.login input[type="submit"]{
margin-top: 38px;
height: 20px;
background-color: #8b9dc3;
color:white;
border: none;
}

.wholelowersection{
height: 600px;
display: grid;
grid-template-columns: 55% 45%;

}

.wholelowersection >div{
background-color: #dfe3ee;

}

.wholelowersection >div:nth-child(even){
background-color: #dfe3ee;
}

#signup{
font-family: Segoe UI;
font-size: 38px;
font-weight: bold;
}

#free{
font-family: Segoe UI;
font-size: 20px;

}

.secondsection input[type="text"]{
height: 36px;

}

.name{
font-size: 20px;
width: 200px;
margin-top: 25px;
text-indent: 10px;
border: 1px solid #ccc;
border-radius: 6px;
}

.flname{
display: grid;
grid-template-columns: 37% 60%;
}

.mp{
height: 36px;
font-size: 20px;
width: 425px;
margin-top: 12px;
text-indent: 10px;
border: 1px solid #ccc;
border-radius: 6px;
}

.secondsection input[type="password"]{
margin-bottom: 10px;
}

#lblbirthday{
font-size: 20px;
}

.birthdayselect{
height: 30px;
width:70px;
margin-top: 5px;
}

.birthdayblock{
display: grid;
grid-template-columns: 38% 50%;

}

.birthdayblock1{
}

.birthdayblock2 label{

font-size: 12px;
color:#3b5998;
display: inline-block;
margin-top: 30px;
}

.gender{
display: grid;
grid-template-columns: 15% 70%;
margin-top: 15px;
}

.gender label{
font-size: 20px;
}

.agreementblock{
display: inline-block;
margin-top: 15px;
font-size: 12px;
color: #696969;
}

.signupbutton input[type="submit"]{

background-color: #228B22;
color: white;
margin-top: 20px;
height: 40px;
width: 200px;
border: none;
border-radius: 5px;
font-size: 19px;
}

.firstcolumntitle{
display: inline-block;
margin-top: 60px;
margin-left: 150px;
font-family: Segoe UI;
font-size: 28px;
font-weight: bold;
}

.firstcolumnsubtitle1{
display: grid;
grid-template-columns: 35% 65%;
margin-left: 150px;
margin-top: 60px;
}

.subtitle11{
font-weight: bold;
font-size: 20px;

}

.subtitle12{
font-size: 20px;
color: #696969;
}

.firstcolumnsubtitle2{
display: grid;
grid-template-columns: 27% 73%;
margin-left: 150px;
margin-top: 60px;
}

.firstcolumnsubtitle3{
display: grid;
grid-template-columns: 17% 83%;
margin-left: 150px;
margin-top: 60px;
}

.agreementblock span{

color:#3b5998;
}


Draw the pattern.


Program code (in c++)

#include<iostream>
using namespace std;

int main()
{
    int a[10]={0,1,2,3,4,5,6,7,8,9};
    for(int i=1;i<=5;i++)
    {
        for(int p=1;p<=5-i;p++)
        {
            cout<<" ";
        }

        int n=1;
        int k=i;

        do{
            if(n<=i)
            {

                cout<<a[k];
                k++;

            }
            else{
                k--;

                cout<<a[k-1];
            }


            n++;
        }while(n<=(2*i-1));
        cout<<"\n";
    }

    return 0;


}


Find smallest positive integer in an array.

Write a function:
function solution(A);
that, given an array A of N integers, returns the smallest positive integer (greater than 0) that does not occur in A.
For example, given A = [1, 3, 6, 4, 1, 2], the function should return 5.
Given A = [1, 2, 3], the function should return 4.
Given A = [−1, −3], the function should return 1.

Program code (in c++):
#include<iostream>
using namespace std;

int find_integer(int na,int a[])
{

    int b[100],nb=0;
    //Arranging array in ascending order
        for(int i=0; i<na; i++)
        {
            for(int j=i+1; j<na; j++)
            {

                if(a[j] < a[i])
                {
                    int temp;
                    temp = a[i];
                    a[i] = a[j];
                    a[j] = temp;
                }
            }
        }
    //Removing elements from an array which is either negative integer or zero
        for(int i=0;i<na;i++)
        {

            if(a[i]<=0)
            {
                continue;
            }
            else{
                b[i]=a[i];
                nb=nb+1;
            }
            //cout<<b[i]<<endl;

         }

       //Removing duplicate/repeated integers from array
        int temp[100];
         int j = 0;
        for (int i=0; i<nb-1; i++)
        {
            if (b[i] != b[i+1])
                temp[j++] = b[i];

        }

        temp[j++] = b[nb-1];

        // Modifying original array

        for (int i=0; i<j; i++)
        {
            b[i] = temp[i];

        }
    //Finding the smallest integer not available in given array 'b'
        if(nb==0)
        {
            int num=1;
            return num;
        }
        else{

        int finalnum=0;
        int k=0;
        int checknum=1;
        int trace=0;
        for(int i=0;i<nb;i++)
        {
             for(k=trace;k<nb;k++)
               {

                    trace=k+1;
                    if(checknum==b[k])
                    {
                       finalnum=0;
                       break;
                    }
                    else{
                        finalnum=checknum;
                        goto l1;

                    }


                }

                    checknum++;

        }

      l1:  if(finalnum==0)
        {
           return checknum;
        }
        else
        {

            return finalnum;

        }
    }


}


int main()
{
    int na,a[100],b[100],nb=0;
    int get_result;
        cout<<"Enter the size of array: ";
        cin>>na;

        for(int i=0;i<na;i++)
        {
             cout<<"Enter the elements of array:  ";
             cin>>a[i];
        }

        get_result=find_integer(na,a);
        cout<<endl<<"The required smallest integer is : "<<get_result;

    return 0;
}

Output